There's a lot of noise around AI right now. Half of it sounds like science fiction, half sounds like a sales pitch, and most of it doesn't actually explain anything. This article is an attempt to cut through all of that.
Whether you're a small business owner wondering if you should be using AI, a parent trying to understand what your kids are using, or just someone who keeps seeing the term and feeling like you should probably understand it better — this is for you.
We'll skip the buzzwords. Here's the real story.
What AI Actually Is
Let's start with the basics.
AI stands for Artificial Intelligence — which is a deliberately vague term, because AI isn't one thing. It's a collection of approaches and techniques that share a common goal: making machines do things that, until recently, required human intelligence.
That could mean recognizing a face in a photo, translating speech in real time, recommending what to watch next, or writing a paragraph that sounds like a person wrote it. These are all different AI systems, each doing different things and built on different underlying techniques.
The key thing to understand is that AI doesn't "think" the way you think. It doesn't understand context the way you do. It's very good at pattern matching and prediction — if you show it enough examples of something, it can learn to recognize patterns and make predictions about new examples. But it doesn't "know" what it's doing in any meaningful sense.
This matters because much of the fear and hype around AI stems from people treating it as more human than it is. It's not. It's a very powerful pattern-matching tool.
A Brief History — The Short Version
AI isn't new. The concept has been around since the 1950s, when computer scientists started asking whether machines could be made to "think." Here's the very short version of how we got from there to here:
1950s–1970s: The early years. Researchers built systems that could solve math problems and play games. The famous "Turing Test" was proposed — the idea that a machine could be called "intelligent" if it could convince a human that it was human in conversation. Progress was slow. The field went through several "AI winters" where funding dried up and interest stalled.
1980s–1990s: Expert systems. Researchers tried to encode human knowledge into rules that computers could follow. These worked in narrow domains (like medical diagnosis) but couldn't scale to the messiness of the real world.
2000s: Machine learning takes off. Researchers shifted from telling computers what rules to follow to letting them figure out the rules from data. Give a system enough examples of something — photos, speech, text — and it can learn to recognize patterns. This is when things started working.
2010s: Deep learning and the image revolution. A specific technique called deep learning, using neural networks with many layers, suddenly made computers much better at tasks like image recognition and speech processing. By 2011, computers could recognize speech better than humans. Image classification exploded. This is when AI started getting real.
2017 onward: The transformer era. Researchers at Google published a paper introducing the "transformer" architecture — a way of processing text that let models learn relationships between words in a way that scaled. This led to large language models (LLMs) — the kind of AI that powers ChatGPT, Claude, and the tools everyone's talking about today.
2020–2023: The generative explosion. Models grew larger, training data grew larger, and researchers figured out how to fine-tune AI systems to follow instructions, reason through problems, and generate human-quality text, images, and code. ChatGPT launched in November 2022, and the world changed overnight.
2024–present: Practical deployment. AI started appearing inside the tools people already use — Microsoft 365, Google Workspace, Apple, Salesforce. The question shifted from "what can AI do?" to "how do you actually use it to do useful work?"
The Types of AI You're Likely Encountering
Not all AI is the same. Here's a quick breakdown of the types you're most likely to run into:
Narrow AI (or "Weak AI") — AI that's designed to do one specific thing very well. Your phone's face recognition, spam filters, recommendation engines, and ChatGPT all fall under this category. These systems are impressive, but they can't generalize beyond their specific task. They can beat you at chess but can't tell you why the sky is blue.
General AI (or "Strong AI") — AI that can think across domains the way a human can. This doesn't exist yet. Every time you see a headline suggesting otherwise, look closer — it's narrow AI doing something very specific very well, not general intelligence. (This is also what folks mean when they talk about “artificial general intelligence”, or AGI.)
Generative AI — AI that creates new content: text, images, audio, video, code. This is what most people mean when they talk about AI today. Large Language Models (LLMs) like ChatGPT are generative AI — they generate text. Image generators like Midjourney are generative AI — they generate images. The key thing to understand is that generative AI produces plausible outputs based on patterns it learned from training data. It's not "thinking" — it's predicting what comes next based on everything it's seen.
Predictive AI — AI that analyzes data to make predictions. Recommendation systems, fraud detection, predictive maintenance, and medical diagnosis support — these are all forms of predictive AI. It tells you what is likely to happen next based on what happened before.
Large Language Models: What They Are and Why They're Everywhere
The AI that most people interact with today — ChatGPT, Claude, Gemini, and their ilk — are powered by something called a Large Language Model (LLM). Understanding what an LLM is helps explain both what these tools can do and where they fall short.
An LLM is, at its core, a very sophisticated pattern-matching system. During training, it's shown billions of pieces of text — books, articles, websites, code, conversations. It learns which words, phrases, and ideas tend to appear together, and in what contexts. It builds a statistical model of how language works.
When you ask an LLM a question, it's not "looking up" an answer — it's predicting what the most likely response looks like based on everything it learned. It generates text one word (or token) at a time, with each step asking, "Given everything I've seen, what's the most likely next word?"
This is why LLMs are good at:
And why they're prone to:
This isn't a flaw that's going to be "fixed." It's fundamental to how the technology works. The implications matter: LLMs are useful tools that require judgment to use well. You have to know enough to evaluate whether what they produce is correct.
What AI Can Do Today — And What It Can't
AI has advanced very quickly in the past few years, but it still has many limitations. Let's take a look.
What AI does well:
What AI still struggles with:
A useful mental model: AI is an extremely capable intern who never sleeps, works very fast, and has read the entire internet — but has no real-world experience and doesn't always check their work. You want them to do the first draft, the research, and the brainstorming. But you want a human reviewing before anything goes out the door. And you also want a knowledgable and experienced human to give them clear, specific direction.
The Concerns: An Honest Look
AI raises real concerns. Let's be straightforward about them.
Job displacement — Yes, some tasks will be automated. This has happened with every major technology shift. History suggests that technology creates more jobs than it destroys, but the transition is real, and the people displaced don't always move smoothly into new roles. This is as much a policy problem as a technology problem.
Misinformation and deepfakes — AI can generate convincing text, images, audio, and video that are fake. The ability to create convincing false content at scale is genuinely new and genuinely concerning. The solution isn't to ban the technology — it's to develop literacy about what AI can produce and build verification habits.
Privacy — AI systems are trained on vast amounts of data, some of it personal. When you use AI tools, your inputs may be used to improve the model (depending on the service). This is worth understanding and being intentional about. Use business-tier accounts with clear data policies for business use.
Bias — AI systems learn from human-generated data, so they can absorb and amplify its biases. An AI system trained on historical hiring data might learn to replicate historical hiring biases. This requires ongoing attention, not blind trust.
Hallucinations and over-reliance — The biggest practical risk for most users right now isn't existential — it's that AI confidently provides wrong information that gets used in real decisions. Always verify. Always review. AI is a tool that assists judgment; it doesn't replace it.
None of these are reasons to avoid AI. They're reasons to use it thoughtfully, with appropriate oversight.
What This Means for You
The bottom line is that AI is a real, powerful, and now accessible technology. It's not a fad, it's not magic, and it's not going away. The tools are becoming integrated into the software you already use — Microsoft, Google, your iPhone, your CRM, your accounting software. Whether you actively adopt them or not, they're coming.
The practical question isn't "should I use AI?" It's "how do I use it in ways that actually help me, without creating new problems?"
That's where someone like me comes in. Not to sell you on AI — to help you figure out which tools are actually useful for your specific situation, how to use them without creating risk, and how to think about the overall role they play in your work and life.
If that's useful, let's talk.
---
Ben is the owner of Spruce IT, a technology support and advisory service for small businesses and individuals in the Harleysville, PA area.
An honest look at what IT support options exist for businesses under 10 people, and why the standard model often misses the mark.
---
If you've ever searched for IT support for your small business, you've probably run into the term MSP — Managed Service Provider. And if you're like most small business owners, you nodded along and moved on without really understanding what it means.
That's fine. But it means you might be paying for something you don't actually need — or worse, missing out on something that's a much better fit.
Let me break it down.
What an MSP Is
An MSP is a company that manages your technology infrastructure remotely. They typically monitor your systems 24/7, handle security patches, manage backups and phone systems, and provide a help desk when something breaks. The model is built around preventive maintenance and risk mitigation — keeping your systems running smoothly so problems don't happen in the first place.
This is a legitimate and valuable service. For larger organizations with dedicated IT departments, an MSP is often essential. They have the budget, the complexity, and the compliance requirements that justify this kind of coverage.
The Problem for Small Businesses
The thing is, Most MSPs are designed for clients with 50, 100, 500+ employees. They price their services accordingly — monthly retainers that can run hundreds or thousands of dollars per month. And their service menus reflect that: server monitoring, enterprise security tools, VoIP phone systems, SharePoint administration.
If you're running a 1-person tax business, a 6-person recruiting firm, a 4-person plumbing company, or a 2-person e-commerce business, you don't have a server farm. You don't have an enterprise network. You don't even have a full-time employee whose job is to make IT decisions (except for you, who always has to think about everything all the time!)
Instead, you have a collection of tools — computers, phones, email, a website, maybe some industry software — and a lot of questions about whether you're using them well.
An MSP isn't built for that. And if you sign up for one, you're likely paying for a lot of infrastructure you don't have, monitoring services you don't need, and a monthly bill that makes you wonder what you're actually getting.
What Small Businesses Actually Need
What most small businesses need is simpler and, honestly, more valuable:
That's not an MSP. That's a technology partner.
The Difference in Plain Terms
Here's the simplest way I can explain it:
An MSP keeps your technology running. A technology partner helps you use technology to grow your business.
An MSP will monitor your systems, patch your software, and respond when something breaks. They're measuring uptime, ticket resolution time, and system health.
A technology partner will ask you what you're trying to accomplish this quarter, whether your tools are getting you there, and what technology could help you do something you can't do today. They're measuring how close you are to your goals.
Both services are valid. But only one of them is useful when you're 1, 2 or 5 people trying to figure out how to take on more clients without hiring a full-time employee.
The Economics: Why Hourly Wins for Small Businesses
Here's the part most people don't talk about.
MSPs work on retainers. You pay them a fixed monthly fee, regardless of how much or how little you use their services. The intent is predictability — you know what you'll spend each month.
But here's the catch: retainers are priced for the provider's predictability, not the client's value.
If you're paying $400/month for MSP coverage and you only actually need $100 worth of IT support in a given month, you're leaving $300 on the table. And if you have a month where you need $800 worth of support, you're probably hitting a cap or paying overage fees that weren't clear when you signed the contract.
The alternative is simple: pay by the hour, and only pay for what you need.
No contract. No retainer. No minimum monthly commitment. If I spend 3 hours fixing something, you pay for 3 hours. If I spend 15 minutes advising you on a decision, you pay for 15 minutes. That's it.
This works for my clients because they never feel like they're paying for something they didn't use. And it works for me because I can be there when you need me, instead of staffing a help desk with a ticketing system that might get back to you in 24 hours, if you're lucky. It also enables me to provide personalized service, instead of a generic call queue.
Where AI Changes the Equation
Here's what's interesting right now.
AI tools have become powerful enough that a small business owner can accomplish things today that would have required an agency, a consultant, or a full-time employee five years ago. Drafting a marketing campaign. Researching a competitor. Automating a workflow. Generating a first draft of a proposal.
The problem is that most small business owners don't have time to learn how to use these tools — and the learning curve is steep. I've been in technology for 30 years, and it took me real effort to figure out how to make AI useful for my work.
That's where a technology partner comes in.
Rather than managing your servers and monitoring your firewall (services you probably don't need at your scale), I can help you actually use AI to accomplish things — write content, automate repetitive tasks, research decisions, build workflows. Not as a gimmick, but as a practical tool that saves you time and helps you compete with businesses that have more resources than you.
If you're curious about what this looks like in practice, let's have a conversation. No contract, no commitment — just an honest talk about what you're trying to do and how I can help you get there faster.
---
Ben is the owner of Spruce IT, a technology support and advisory service for small businesses and individuals in the Harleysville, PA area.
A few years ago, my eldest child hit 6th grade and the number of times (a day!) he asked us for a phone went through the roof. We heard all the usual arguments - all his friends had one (some of them since 3rd grade!), he needed to be able to look up info for school assignments, his lack of a phone made him a social outcast…any of these sound familiar?!
For many families, sending our kids off to middle school comes with another rite of passage these days: handing over their first mobile phone. We all want our kids to be independent and not feel left out, and we also want to be able to stay in touch and keep in touch when they’re away from home more often. And while giving them a mobile phone makes sense, I believe that giving them a smart watch is ... well ... smarter.
Here are a few reasons why.
Today, there are multiple smartwatch options that don't need to be tethered to a phone. They have a cellular connection, which means they have their own phone number, but you do the setup from your device and then hand it off to your child. Some devices that don't require device tethering include the Apple Watch SE (my recommendation), Samsung Galaxy Watch 5, and the Verizon Gizmo Watch 3.
Let's face it -- mobile phones are a distraction for everybody --perhaps especially us adults! And of course, you can't expect a middle schooler to manage this distraction effectively. Sure, you can put away devices at night, but they will still creep into your daily routine frequently ... whether it's in school, at the dinner table, or just when you're trying to have a conversation (which can be hard enough with a tween!)
There is mounting evidence that social media can have a negative effect on children. (Side note: for a really great, research-based take on the impact that technology and social media are having on kids, check out Jonathan Haidt’s Substack, After Babel)
Personally, we have chosen to hold off on letting our kids use any social media -- their "social media" is iMessage. Eventually, they will, but in my opinion it's best to keep them off it for as long as possible. Smartwatches simply don't have social media, so they couldn't even use it if they tried.
If you get a smartwatch with cellular (which is really the only kind to get in this circumstance), your child can still call and text you anytime. And you'd be amazed by the call quality (we have Apple Watches in our house, and I really can't tell the difference between the watch and a speakerphone on an iPhone).
Smartwatches have GPS, so you can find your child's location at any time using the "Find My" feature on your iPhone or "Find My Device" on Android.
Smartwatches are usually tougher than phones (Apple, for example, uses a strengthened glass called Ion-X) and more water-resistant. They are also smaller and lighter, which makes them less likely to suffer fall damage. And of course, they’re usually strapped to your child's wrist, so say goodbye to lost devices. They can be used when playing sports, in the water- you name it. You can also add a small case to provide extra protection (your child will still find a way to break it—at least mine will!).
You set up the smartwatch from your phone and then control which apps can be installed. You can also manage "downtime" for times when you don't want your child using their watch (say, during class).
Both the setup cost and the monthly fee will be lower than those of a typical mobile phone. You can buy most watches for less than $250 upfront, so you'll just be paying the monthly fee for the line (which includes cellular service), usually at a special "wearable" rate. Many mobile providers also offer payment plans or discounts.
If your child already has a tablet, they can set up their phone number on it and sync messages between the two devices. Ditto for any apps that are available on both devices. This is a great way to give your child a bit more capability than a watch when they are home and not completely unsupervised.
My strong recommendation is the Apple Watch SE. It includes cellular service, comes in multiple watch sizes, and is reasonably priced. It also has all the features of its more grown-up brethren, so you won't miss out on anything. The setup features and parental controls are second to none and, in typical Apple fashion, well thought through. The one caveat is that you will need your own iPhone to set it up -- so if you are an Android family, then you'll want to go for my Android recommendation instead.
If you prefer the Android ecosystem, your best option is the Samsung Galaxy Watch 5 (or one of the newer models), which you can set up as a standalone device. And if you want something inexpensive and don't care about syncing it with iMessage or Android messaging, another great option is the Verizon Gizmo Watch 3 (it's also great for younger children). There is also the TickTalk 5, if you don't want to be tethered to the Apple or Android ecosystem (or if you and your partner have different types of phones).
Note that in most cases, you'll want to pay up front for the device so it is unlocked. From there, you can contact your cellular provider to activate the number. However, if you are on AT&T or Verizon, you can streamline this process by buying the device from Best Buy or directly from your cellular provider. You will also be able to opt into a payment plan if you go this route.
I hope this helps you and your child ease into the ocean that is today's technology.
Cheers!
-Ben
The best Wifi routers for families typically have these characteristics:
Before we get to the picks, there are a few things that you should understand.
These days, many wifi systems will be "mesh". A mesh network includes multiple "nodes", which automatically "mesh" together to provide fast and reliable wifi coverage, even in large homes. A typical mesh network consists of a base station and one or more satellites, all of which connect together automatically.
Mesh networks also support dynamic routing, so you can have a single wifi network and single password, and your devices (even as they are moving around) will automatically connect to the fastest available node.
In the past, if you had areas of your home that had poor wifi coverage, you would need to install a wifi extender or repeater. These are a pain to set up and are always significantly slower than your main router. Fortunately, the bad old days are over and with mesh routers, it's all completely automatic.
Today's wifi network environments also include many different types of devices, from phones to computers to TVs to smart home appliances. Each of these devices has different connection requirements, and some of them (mainly smart home appliances) don't support 5G networks, so in the past you've had to set up different networks (2.4G vs 5G) for different devices. Mesh systems allow you to have a single network with a single passcode that all devices can use; the devices just connect using whichever network works for them. You can still set up separate networks if you want -- but it's not necessary.
Unless your home is small and you don't have any issues with wifi speed today, then you'll want at least 1 base station and 1 satellites node.
My recommendation is:
You'll also want to add nodes if you have challenging setups like plaster walls, metal structures, or homes that are very widely spaced out. If you're not sure how many satellites you need, it's usually best with 1 and then expand from there -- most manufactures will sell single nodes.
BTW, there is such a thing as "too many" nodes, so don't overdo it!
Now that we've covered the basics, let's get to the picks!
Here are a few other concepts to understand when shopping for a mesh router.
There are two devices that you need at your house to get online -- a modem, and a router. While a modem connects your home to the internet, it is the router that shares this internet connection with your devices.
Typically, your Internet Service Provider (ISP) will provide you with a modem, and sometimes they will provide you with a router as well. You'll want to use the modem they gave you -- it's specially designed and configured for the service you have -- but what router you use is up to you.
I recommend not using the router from your ISP for two reasons:
You may already have a router from your ISP. If not, no sweat -- it's very easy to swap it out. You will want to send it back to them though if you are paying for it!
When you're looking for mesh systems, you'll likely come across the term "Wifi 6" and "Wifi 7". This refers the WiFi protocol supported by the router. WiFi is technically faster -- and if you have gigabit internet you might notice the difference -- but chances are you don't have a device that can make use of it, so don't worry which one you get. WiFi 7 is more "future proof" but honestly, you'll probably replace your router before your devices notice the difference.
If you happen to have wired ethernet installed in your home, then you can take advantage of the "wired backhaul" feature to make your network even faster and more stable. It works by connecting the base station and one or more satellites via ethernet. When connected in this way, the satellite nodes are able to offer much stronger (and therefore faster) signal.
Modding a Minecraft server is certainly not the easiest thing I’ve ever done. (The difficulty level is somewhere between hanging a screen door and changing a diaper for the first time.) With that said, I’m here to make the lives of my fellow parents just a little bit easier.
‘Vanilla’ Minecraft is certainly fun and full of endless possibilities for gameplay. But modding takes the experience to a level that can be both fun and ease some of the frustration of the game (how many times have you wished you had a map or a quick way to set a waypoint, or just needed a diamond axe, like RIGHT NOW?)
There are a few fundamental concepts that you should understand before you begin.
1) Client vs Server
If you’re not familiar with computer lingo, this is something important to understand. A ‘client’ is the computer you use to play Minecraft, whereas a ‘server’ is the computer that hosts Minecraft. In some cases these may be the same computer (and yes, you can run the server and the client at the same time on the same computer), and in other cases the server may be in the cloud.
2) Minecraft game versions
Currently, there are two major versions of Minecraft: the Java Edition, and Bedrock edition. This article refers to the Java edition, which is the version that you’re likely to use on your PC or Mac.
(Note: the ‘Bedrock edition’ is also available on PC and is cross-compatible with Xbox and some mobile versions. This is a completely different version and is not compatible with the Java edition. Mods are also uncommon for Bedrock as they are difficult to implement.)
3) Minecraft app versions
Minecraft is updated often, and it’s important to know what version you’re on mainly because other clients (i.e. your kid’s computer or their friend’s computers) will usually need to be on the same version to play together. In addition, the server (i.e. where you’re hosting Minecraft) needs to be on the same version as the client.
4) Modding frameworks
Before you can install mods, you’ll need to install a modding framework. I recommend Forge because a) it’s easy to set up and b) it’s widely used.
5) Mod versions
The mod version you install must match the client/server version. It’s a pain, but hey, c’est la vie.
6) Client vs server mods
Some mods only run on the client, but in most cases, the mod will require both client and server to be updated. The mod install page should specify.
1) Set up your server
Unless your kiddo is content to play solo (which is totes fine btw, no judgment here), you’ll need a server to run Minecraft on. While you can run a server on any PC, I prefer cloud servers such as ApexHosting, BisectHosting, etc. as it can be a little challenging to share your server through your own network, and it could open you up to security issues.
The process of setting up a server is pretty straightforward and has been documented about 40 million times, so I’m not going to outline it here.
2) Install Forge
Grab the latest version of Forge here. I suggest using the ‘recommended’ version and downloading the installer. Load it up, and choose the option to install the server (if you’re setting up a local server) or client (if you’re installing on a PC or Mac client).
Note that if you need to install a specific version of Minecraft for your mod, you’ll also need to install that version of Forge as well (more later on about how to configure older versions of Forge if you are using a mod which requires it).
If you’re setting up Forge on a cloud server, then you’ll have to follow the instructions for your specific server. Typically there will be a setting somewhere in your server hosting panel that allows you to change the server type from ‘vanilla’ Minecraft to Forge. (If you already have a map set up, I’d suggest backing it up first before changing the server type.)
3) Install mods
You can find mods by searching on Google, or via niche sites like Curseforge. I’m not going to go into what mods to install here — suffice it to say that there are practically an infinite number of them — so you’ll have to do that legwork on your own. (Pro-tip: there are a number of YouTubers who regularly post ‘best of’ videos which are a good place to start.)
Once you’ve downloaded your mod — and again, make sure that the mod version is the same as the client/server version — you’ll need to install it on both the client and the server.
All mods must live in a folder called mods which is underneath the Minecraft install folder. On a client PC, you can find the mods folder underneath the folder
\AppData\Roaming\.minecraft
(For a quick way to navigate to this folder, type %appdata% in the Windows Start menu.)
On client Mac, you can find it underneath
~/Library/Application Support/minecraft
(For a quick way to navigate to this folder, click the Go menu and select Go to Folder.)
For your server, the location entirely depends on where you’re hosting the server. If it’s a PC server then it would be in the same location where you installed the Minecraft server. If it’s a cloud or Linux server, then it’s probably underneath the root folder.
Once you’re in the mods folder, just drop the mod in there. (If you don’t see a mods folder, just create one.)
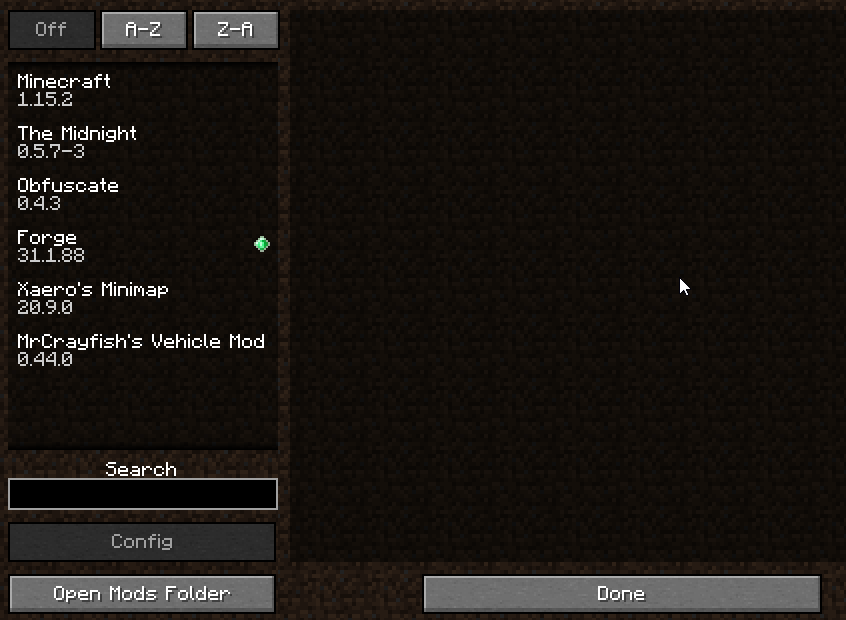
4) Test
Load up Minecraft on one of your computers. To the left of the Play button, you should see a menu with a list of installations. Click it, and you should see the Forge installation. Select that, and click Play.

The Forge-ified version of Minecraft should boot up. You’ll see a screen like this:

Once Minecraft fully loads up, you should see a button labeled Mods. Hit that button, and if you nailed the install, then you’ll see a list of the mods that you installed. If you don’t, try again.

To test your server, you’ll simply need to play on it. If the mod doesn’t work, then most likely you missed a step, or the versions are out of synch between the server and the mod or the client and the server.
5) Play
Have fun!
Help! The mod isn’t working.
Here are a few reasons why this might happen:
Help! My server is crashing.
Usually this is because:
In the case of #1, you should contact your server provider. For #2, double-check the mod version against the server, and reload it. For #3, make sure not to get the Gremlins wet next time.
Help! The mod I want to use is only available on xx version of Minecraft.
You’ll need to:
To install an older version of Forge, simply download and install it. It won’t overwrite the newer version.
To install multiple versions of Minecraft, see the ‘Advanced Tactics’ section below.
Help! I just want to mod my kid's minecraft on their computer and not set up a server.
Cool! Just ignore everything about servers and follow the modding instructions, and you should be good!
Help! I just died in lava and lost all of my loot :'(
Carry a water bucket with you next time.
There are two ways to manage multiple versions of Minecraft (and therefore multiple mod versions): the simple but wonky way, and the more complicated but stable way. I’d recommend the latter.
Simple but Wonky
Create a subfolder inside of your mods folder with the version number, and then place the mods in there. For example:
.minecraft\mods\1.15.2\
The issue with this approach is that some mods won’t recognize the folder structure.
More Complicated
Create a separate game directory for each version. To do this, launch Minecraft, and then click the Installations tab.

Select the app version, click the … menu to the right of the Play button, and click Edit.
Now click the ‘browse’ button and select the folder where you want to install the app version files. I’d recommend putting it under your main Minecraft folder, and then creating a subfolder called gameversion or something like this. You should then create another subfolder for each version that you want to install which should have a mods folder underneath it. Ultimately, the file structure should look something like this:
\AppData\Roaming\.minecraft\gameversion\1.15.2\mods <-- PC
~/Library/Application Support/minecraft/gameversion/1.15.2/mods <-- Mac
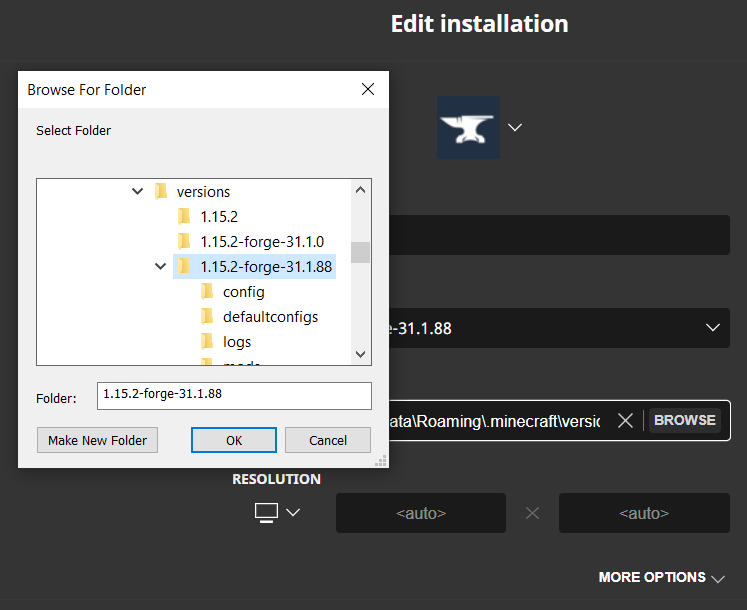
Click Save when you’re done.
Minecraft will then automatically create all required files when you launch it, so all you have to do is create the folder.
Launch Minecraft, and then go back to the folder. The mods folder should be created for you automatically. Add your mods to the folder, and then go to town.
(seriously though, go back and read the whole thing)
To add mods to Minecraft you’ll need to:
If you have any questions or run into any issues, let me know!
DNS (domain name service) is like the phonebook for the internet. When you type "www.google.com" in your browser, computers behind the scenes use that information to find Google's servers and send you there. Google's servers (and other websites) are actually hosted using what's called IP addresses, which are formatted as numbers separated by dots, e.g. 192.168.1.1.
Fortunately, because of the magic of DNS, we can use what's called a "DNS resolver" to easily and safely route any internet traffic from any devices within your network, and block inappropriate sites as well as malware, without having to set up site block lists, whitelists, etc.
Here's how.
There are many "family" DNS resolvers available. Personally, I like CloudFlare's "1.1.1.1 for Families". The DNS servers you want to use are:
Primary DNS: 1.1.1.3
Secondary DNS: 1.0.0.3
You can learn more about CloudFlare's DNS for families here.
An alternative is the CleanBrowsing filter which can be found here.
Your Wifi router typically includes the ability to configure DNS settings. First, you'll need to log in to your router. If you've never done it before, be aware that login process can vary based on the router. You'll also need to know your router's local IP address or name. Here are a few articles which can help:
https://www.pcmag.com/how-to/how-to-access-your-wi-fi-routers-settings
https://race.com/blog/how-to-access-router-settings/
Alternatively, you may be able to log in to your router using a mobile app. Many providers include apps nowadays, so take a look at the brand of your router (ASUS, Netgear, etc.) and then check the app store for an app.
The DNS settings can typically be found under the "WAN" settings your router's configuration. The location of the WAN settings will vary, and I've included a few screenshots below to help you navigate.

The last step in the process is to update the DNS settings to use the DNS resolver. Again, this will vary based on your router. I've included an example from my ASUS router below.

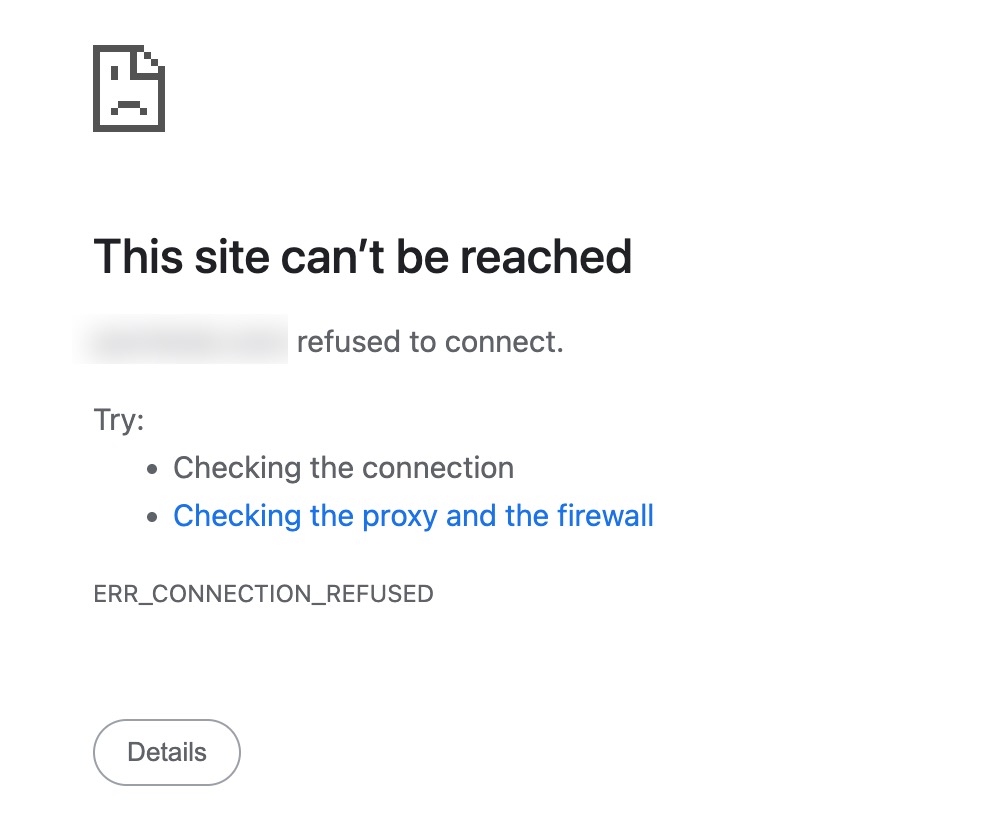
Make sure to enter the primary server in the first box, and secondary server in the second. When you're done, save your settings, and then reboot your router. To make sure that it worked, try accessing an inappropriate site. You should get a "site can't be reached" message like the one below.
That's it!
Now, if it didn't work, or you can't get any site to load at all, don't sweat! Just go back to your router settings and disable the option for manual DNS or select the option for "default DNS", and then reboot your router. I promise nothing will be permanently broken :)
I hope this was helpful. Please feel to reach out if you need help!